Archive for the ‘equipment’ tag
On the Road……Downtown Sausalito’s Seal Statue

I have a love/hate relationship with the iPhone’s camera.
This twilight photo made over the weekend seriously stresses its photographic limits and although the camera is often good enough, it has two big flaws:
- Image quality: it cannot handle wide dynamic range and low-light conditions very well.
- Handling: it is slow to start up, clunky, and ergonomically infuriating.
Nonetheless, the old cliche still applies: “The best camera is the one that you have with you.”
And I almost always have the iPhone with me.
Still, for me, it’s a highly unsatisfying photographic tool. And, the tools we use in our daily lives — the quality of their craftsmanship and their aesthetics — are important. Right?
I recently sold two older digital cameras on eBay so I’m allowing myself to look at new cameras again. The highly touted Sony RX100 is a pocketable camera, but with image quality, resolution, and low light capabilities that vastly outperforms every other small-sized camera on the market.
Unfortunately, the Sony still does nothing for me from an aesthetic standpoint. It has few manual controls and no viewfinder, for instance. So it really only solves half the problem presented by the iPhone’s camera — i.e. vastly improved image quality. It does not fully address the handling issue.
If only an aesthetically pleasing, elegant, and functionally designed camera body like the Olympus XZ-2 or Fuji X10 could be married to Sony’s wonderful, large sensor.
That combination would be a truly satisfying photographic tool!
-Nathan
Random Images……Desert vistas with the iPhone 4’s camera
Many of the pictures posted over the last few months were created with the iPhone’s built-in camera.
The image quality is inferior to my Lumix LX-3, but the LX-3 was itself a compromise. I used it mainly because it was smaller and more convenient to carry on my bicycle than the alternatives.
Now, size and convenience are winning out again — hence the increased use of the iPhone.

 Show on map
Since these images are primarily intended for the web (and never larger than 650 pixels wide) I have some margin for error in terms of image quality. That’s why I can still produce acceptable results even when facing tricky lighting situations like those seen in these desert vistas. (However, for the first shot I had to combine two exposures in order to retain marginal detail in the foreground shadow areas.)
The biggest drawback is that printing larger images for a gallery show or portfolio may not be achievable. For this, I could really use a larger sensor, but still compact, Olympus EP-3 or Fuji X-100 — which are the cameras I’m drooling over currently.
However, at this point, I should remind myself of the unlimited nature of material desire and the profound teachings of the Buddha — especially his “Second Noble Truth.”
Nathan
Gear Gallery……Velo-Geo-Photo blogging tips, Part I

Since I began publishing this blog a year-and-a-half ago, I haven’t talked much about behind-the-scenes stuff.
So I’m changing things up today.
In this post (Part I), I’m outlining some of the tools and equipment I find most useful as a Velo-Geo-Photo-blogger. Then, in the next installment (Part II), I plan to talk about my general process for making photographs and observing my surroundings while out on a ride.
First, the tools of the trade:
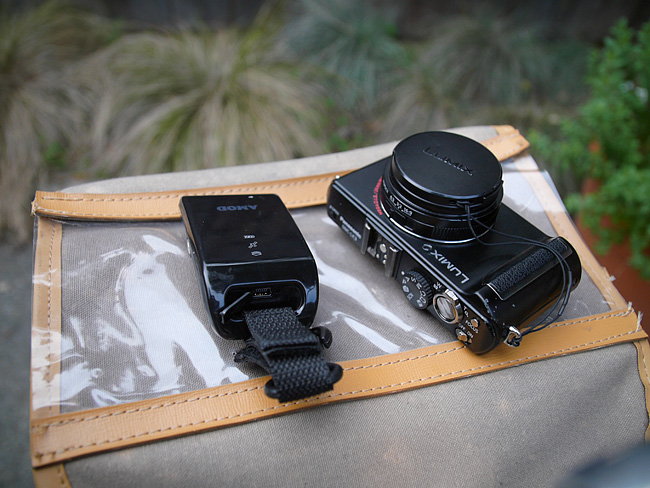
A camera: When riding, I almost always bring along a Panasonic LX3 with its Leica branded 24-60mm lens. I’m a big fan of Panasonic/Lumix cameras. I had the LX1 before this and also own the less known L1. At 60mm, the LX3 is a bit lacking on the long-end of its zoom range (I think the updated LX5 zooms to around 90mm), but it is very compact and fits perfectly in the pocket of my handlebar bag.
A gps logger: My AMOD 3080 is critical for determining the GPS coordinates of a photo or location. I can record individual points of interest by pressing a button during the ride. After the ride, I can also time sync the gpx file of the data logger with the photo files in order to determine the precise location of each photo. (Note: a more elegant and time saving solution would be to carry a camera with built-in GPS capabilities which writes geo-data automatically to the photo’s metadata. Then I would only need one gadget on board, not two.)
Some critical equipment
A front rack and handlebar bag: My old Guerciotti has neither cantilever brake mounts on the forks nor eyelets on the front dropouts so my rack choices are limited. I ended up installing the versatile Mark’s Rack from Rivendell and use a classic TA bag I bought on eBay many years ago. I don’t have a decaleur so the bag flops around a bit when I ride. Some plastic stiffeners would help I just haven’t gotten around to addressing this problem yet.

Camera, GPS logger, and TA bag
Photo processing software: I use Adobe Photoshop CS3 and Bridge (which acts as a digital light table for viewing and sorting images) on an older Mac G5 and Apple cinema display.
For making images and posting them to the web I usually follow these steps:
- First, create a composition to best capture the subject matter (this can take several attempts and may require careful cropping of the image).
- Make creative changes as needed (e.g., adjustments to contrast, color, or luminosity) so the image expresses the feeling of the scene as it was experienced. This is critical. Remember what Ansel Adams said: “The negative [read: digital raw image] is the score; the print is the performance”.
- Re-size the image (in my case to around 650 pixels wide) and down sample the resolution (to around 100 ppi) so it properly fits the intended space and so the file doesn’t take up too much memory.
- Lastly, sharpen the photo while viewing it at the final size and resolution. This is very important and a reason many images do not look very good is that they are not optimized for viewing on the web at the actual size they are displayed.
A blogging platform: I use WordPress.org and a heavily modified version of the Black Letterhead theme. I also use various WordPress plug-ins. The most indispensable is Geo Mashup. It’s fantastic. One of its most useful features is the ability to display each post’s image on a main map page. I also use XML Google Maps, WP-prettyPhoto, and WordPress Video Plug-in.
A bicycle: Often it’s a steel-framed Guerciotti that I’ve owned since high school outfitted with mostly Campy components, a recently added 12-28 suntour 6-speed freewheel, a Brooks titanium rail saddle, and Grand Bois 28mm tires!

