Archive for the ‘GEAR & EQUIPMENT’ Category
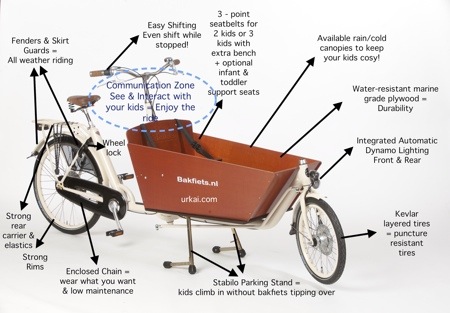
Gear Gallery……Bakfeits
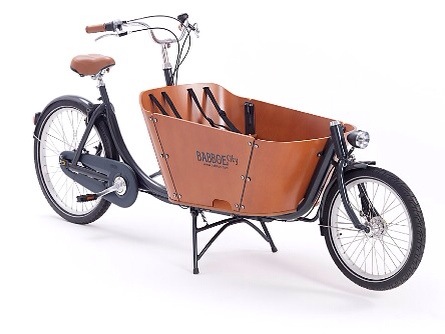
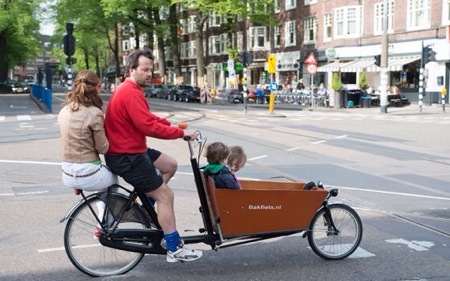
I’ve been hanging out in CA at my brother’s place with my little nephews. We’ve been making the rounds around town with the boys in his Phil and Ted’s double stroller.
It’s a big investment, but I’ve almost convinced him to consider purchasing a Bakfeit (with an electric assist to help get up the long hill to the house) as an alternative to the stroller.
The Bakfeit is pricey. It’s best to think of it as a car replacement to justify the $3000 cost.
CETMA is a popular, made in the USA cargo/Bakfeit option. The classic Dutch-made version is here.
Gear Gallery……Bata Biker at TFC world headquarters
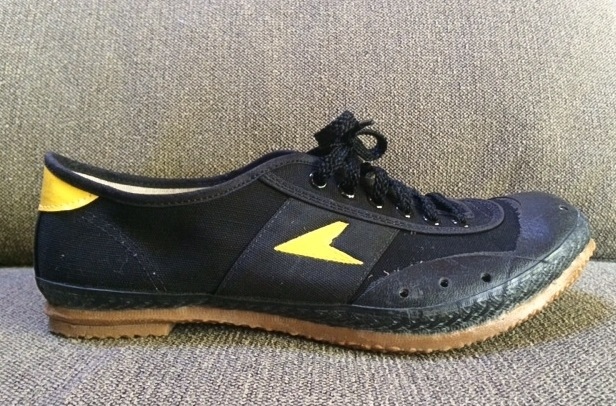
Bata Bikers are to classic, steel-framed, bike-loving cyclotourists:
+ what the Cape Buffalo is to Hemingway;
+ what the Grail is to the Arthurian knights;
+ what his beloved wife Mumtaz Mahal (and the Taj Mahal) is to Emperor Shah Jahan.
That is: Part obsession. Part devotion. Part unrequited longing.
Well…the elusive Bata Biker has finally arrived at The Friday Cyclotouriste world headquarters.
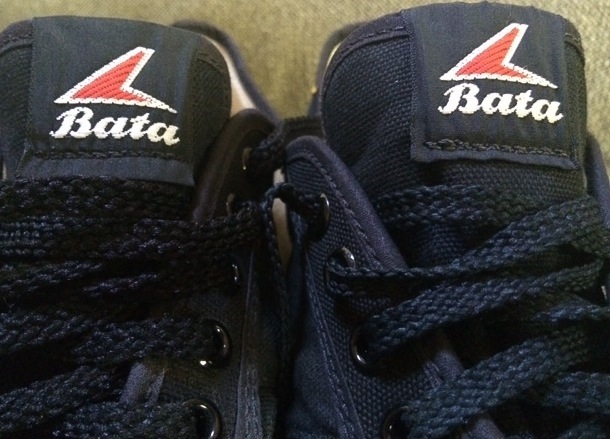
According to the analytics of this site, my posts on bicycling shoes are all in the top 10 of the most searched and the most viewed. In my first of these posts I mentioned the fabled Bata Biker shoe.
My most recent cycling shoe discovery was the ASICS Keirin, which I wrote about here.
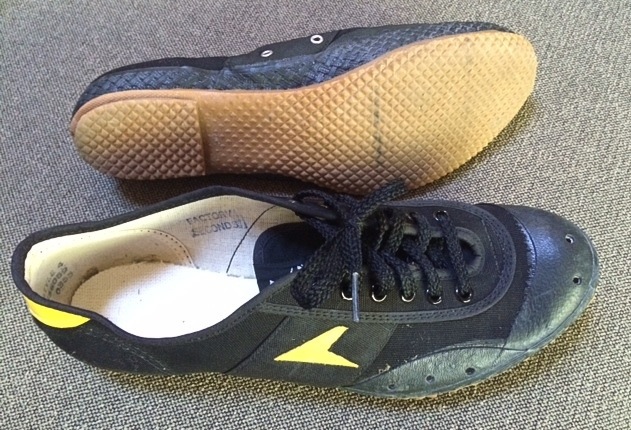
Still, the classic Batas seemed like a perfect low-profile, lightweight, canvas bike touring shoe with semi-rigid soles for either flat pedals or pedals with toe-clips.
Yet they are impossible to find — anywhere. Bata ceased production sometime in the early 80s, I think.
Given this, when I recently saw a pair of unworn Bata Biker factory seconds in my size on eBay, I scooped them up.
Gear Gallery……Three objects of desire
Desire is too strong.
Three objects of admiration is maybe more accurate.
Really, this is just some cool stuff that caught my eye this week — stuff I’ll probably never own — but stuff with clever design and craftsmanship that’s fun to appreciate.
First of all a gorgeous bicycle rack and shelving unit made of natural wood and copper water piping:

See Method Studio for more details.
Next is the latest camera system from Leica — the T:
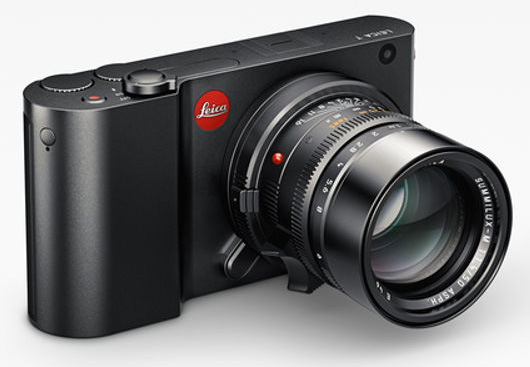
Leica prices are somewhat out of control. The cheapest lens for the new T system is the $1,800 18–56mm ƒ/3.5–5.6. See the dedicated Leica T site for more details.
Finally, a sleek, lightweight teardrop trailer with an expandable pop-top — the Alto R series:
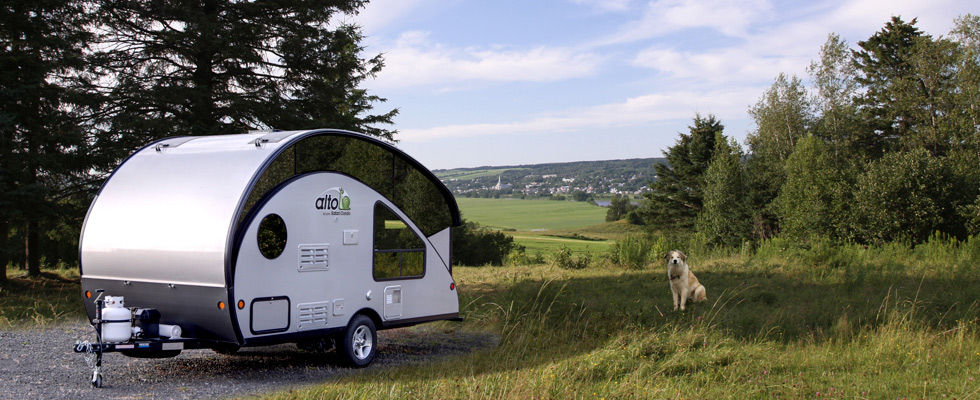
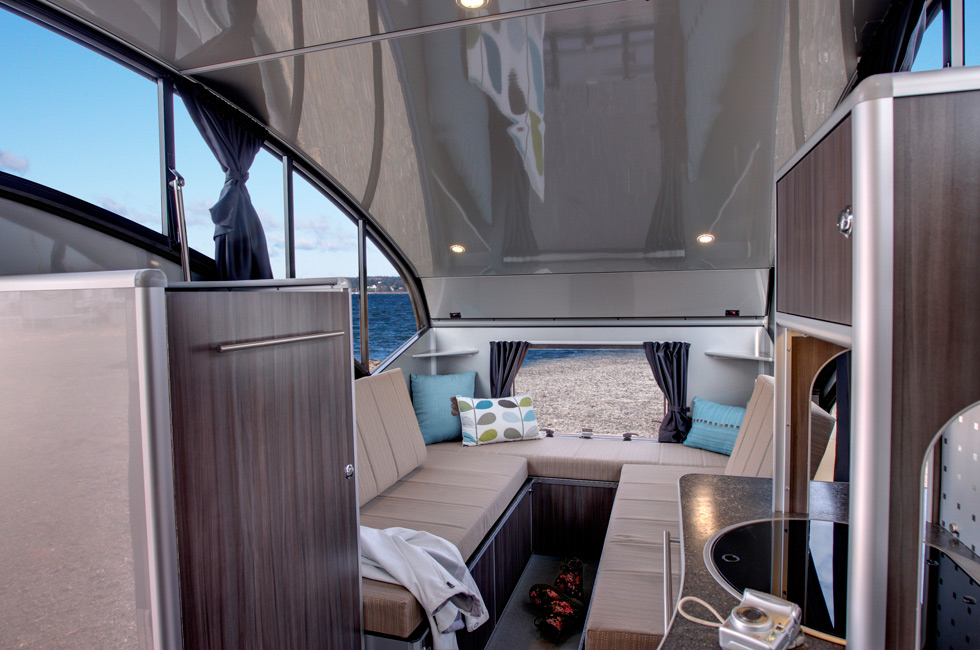
I’m not sure which is better this or the trailer designed by the NASA engineer I wrote about a few years ago. For more information about the Alto pop-top check out the manufacturer’s website.
-Nathan
On the Road……Coastal Sunset & Digital Metering w/ Sony RX100

 Show on map
Here’s the sunset at 8:04pm from Thursday’s ride in the Marin Headlands.
The light was tricky. It was well into twilight, and there was a sharp contrast between the lightest and darkest areas in the scene.
(Note: roll your mouse over the image to see the extreme difference in the unprocessed camera file.)
For a landscape scene like this a serious photographer would typically use a large-sensor DSLR camera plus:
- a tripod (to allow for a long exposure to let in more light without introducing blur from inadvertent camera movements) and
- a graduated neutral-density filter (to control the scene’s dynamic range by reducing the brightness of the sky — but not the foreground).
However, my little Sony RX100 (reviewed here by NY Times tech writer David Pogue) handled the scene fairly well.
Here is the processing technique I recommend for this — or really any — digital photograph:
- Choose an exposure that preserves the brightest areas in the scene. That is, “expose for the highlights” to retain the vivid color and detail which might otherwise get “blown out”. Metering the scene like this will render the rest of the image too dark, but that’s okay. When mousing over the above image, you can see how everything — except the sky, the bike’s shiny metal parts, and the clear water bottle — is way (and I mean way) underexposed.
- Tweak the shadow areas in post-processing according to taste. Here is where we adjust areas that are too dark. When I opened-up the shadow areas in Photoshop using a curves adjustment layer there was surprisingly still enough detail hidden in the file to create a decent image (at least for viewing on the web). In most images the before/after differences will be less extreme, but the technique will be the same.
By the way, this is the exact opposite of what Ansel Adams did in his black and white film photography. He would “expose for the shadows“, that is, meter the darkest area of the scene to preserve wanted detail, then in the darkroom develop the highlights to taste.
The difference in technique is a function of how digital sensors and film emulsions handle highlight rendering. For a good discussion of Adams’ technique and his Zone System, see this article.
-Nathan
Gear Gallery……The Grand Bois Lierre

I finally upgraded my tires from the Panaracer Col de la Vie to these: the Grand Bois Lierre.
You may not think 2mm makes much of a difference, but on my first ride the 38mm-wide Lierre felt much cushier and seemed to move more effortlessly over broken, chipped pavement than my old 36mm-wide Col de la Vie tires did.
So if you have 650B-sized wheels — this upgrade is a no-brainer.
Of course, if my bike could fit them, I would love to be riding the even cushier (but still fast) 42mm-wide Grand Bois Hetre. The brownish-red tread is very cool (downright sexy some would say — if it’s possible for a bicycle tire to be sexy.)

Gear Gallery……Having it all? Versatillity, speed, and sprightliness
Is it sacrilege (or fickleness) to doubt my relationship toward my two primary bicycles: the Guerciotti and the Ebisu because each has something the other lacks?
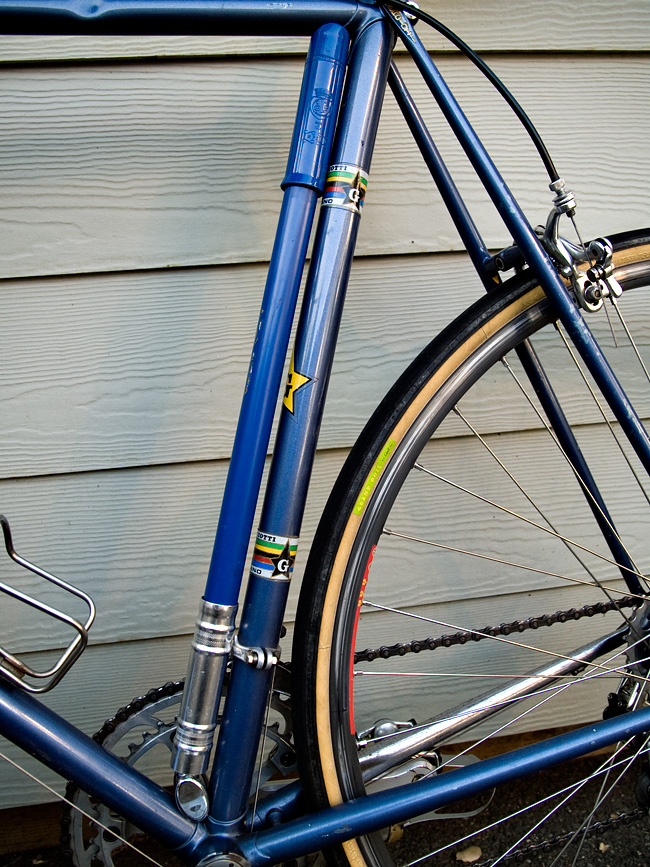
I made some tweaks to my Guerciotti’s set-up about seven years ago and ever since I’ve been pretending it’s a randonneuring-style bike and the truth is it’s really not. The Guerciotti is a racing bike with classic Italian geometry. It doesn’t hold a front handlebar bag that well and although I’ve shoe-horned 28-29mm wide Grand Bois tires onto it, the bike’s narrow clearances will not except fenders.
The bottom line: it’s fast and really fun to ride, although a bit twitchy like an Alfa Romeo.
But most importantly the bike’s super light tubing allows it to “plane” — an elusive (some say phantom) sensation whereby the frame’s flexibility works in a sort of mysterious, mechanical harmony with the rider. Jan Heine, the publisher of Bicycle Quarterly, coined the term “planing” as it pertains to bicycle performance and has written about these subjects extensively.

Guerciotti (circa 1982-83, 59cm frame)
My Ebisu, on the other hand, was purposely built to carry a loaded handlebar bag (it can even be set up with front panniers for a short tour) along with wide tires (up to 38mm wide) and fenders. But if I’m honest, the Ebisu is not quite as responsive and fun as my Italian racing bike. Continuing the car analogy, if the Guerciotti is an Alfa, the Ebisu is a Subaru Forrester.
So what are the underlying causes of these differences? I’ve pinpointed two:
- Responsive shifts: the 9-speed cassette on the Ebisu makes manual friction shifting a fine, delicate operation. On the other hand, the Guerciotti drivetrain is based around a more direct, positive feeling, 6-speed freewheel. The difference is significant.
- Planing: my Ebisu frame feels stiffer than the Guerciottti and it does not noticeably plane while riding. Understandably so. The Ebisu was constructed by master builder Hiroshi Iimura as more of an all-around bike capable of mid-to-light weight touring. But I do miss the feeling of riding my racing bike when I ride something else. The joy of pedaling hard and covering varied terrain is related — at least for me — to the stiffness of a bicycle’s frame.
It took time, but I discovered my preference for a more flexible frame through trial and error after pedaling different kinds of frames many miles over northern California’s hilly roads (and from reading Jan Heine’s articles in Bicycle Quarterly).
My Ebisu is perfectly designed for its purpose and performs more the way I like when it’s carrying extra weight. It seems that the additional weight (since I’m only 150-55 lbs.) causes the Ebisu frame to flex more than normal thus making the frame more responsive and lively when fully-loaded (as opposed to when it is ridden un-loaded).

Ebisu (circa 2006, 59cm)
Where does this leave me?
It means I need to find a bike close in design to the Ebisu, but with light, flexible, tubing like the Guerciotti. The only question is whether to base it around a 700cc 32mm tire or the highly-reviewed 650B 42mm Hetre tire?
Below are some images of bikes and makers which include the option of using super lightweight tubing in their designs.
 Jan Heine’s custom Rene Herse
  MAP bicycle in 700cc wheel size
 Boxer Bicycles
  MAP bicycle in 650B wheel size
 Box Dog’s Pelican (a local Bay Area company).
 Terraferma Cycles (courtesy chasingmailboxes)
Gear Gallery……The Vintage Bicycle Print Pocket Square

The ascot, neckerchief, and pocket square: These are the third rail of men’s clothing.
Wear them at your own risk and prepare to suffer the consequences — ridicule from your guy friends and, bemused, emasculating laughter from the girls.
Despite all the risks, I’m considering integrating a pocket square into my wardrobe lineup.
I probably wouldn’t choose this one (it crosses over into the foppish category, at least to my eye), but it is in stock on the Unionmade website. Drake’s — a venerable English clothier is the maker.
-Nathan
Gear Gallery……1972 Schwinn Paramount in full Chrome

This is Harry. I bumped into him at the tail-end end of the Marin Civic Center Farmer’s Market on Super Bowl Sunday. His chrome-plated 1972 Schwinn Paramount jumped out me like the organic strawberries my friends had scored earlier. I asked him to pose with his 1972 Paramount next to a nearby 1972 VW beetle.

The Brooks saddle has a well-worn patina from years of use. The components look mostly (if not all) original including a Campagnola Nuovo Record groupo.

The Nervez lugs look beautiful in full chrome.
Gear Gallery……The Faraday Porteur
Here’s the electric bike I mentioned in a previous post.
The electronic motor is a sensible addition for a city like San Francisco. The Faraday’s other design choices are simply brilliant and informed primarily by real bicyclist enthusiasts (rather than just by engineers).
I’m especially pleased that it comes with my favorite rack design (i.e. the porteur, a front rack pioneered by newspaper deliveryman in Paris in the 1940s and 50s).

Full disclosure: it may not be apparent from these glowing statements, but I am generally biased against electronic bikes. With the motor, it feels like cheating…a little.
-Nathan
Gear Gallery……Keirin Shoes from ASICS

A stylish, retro-looking shoe made by the Japanese company ASICS. These Onitsuka Tigers are modeled on classic Keirin (i.e. track racing) shoes of the 1970s. They don’t seem to be genuine cycling shoes, however — they have a slightly spongy sole which isn’t usually what bicyclists want. But they are on sale at Zappos (as of 03/29/12) and so I took a risk and ordered a pair.
This purchase is part of my never ending search for the perfect cycling shoe (see this post and this one too for the earlier chapters in this on-going saga).
Greencycle eco-friendly bikes

I discovered this project at the modern industrial design site, Yanko Design.
I can’t speak to the practicality of doing away with the downtube — as far as riding stability and structural integrity are concerned — but this is a pretty cool concept.
The designer is Paulus Maringka, Auckland Institute of Technology. Read his academic abstract and/or download his entire 372 page trans-disciplinary design thesis or visit the Yanko Design site to see more pictures of the Greencycle.

Gear Gallery……A DIY handlebar mount for my camera
I’ve had a nagging desire to shoot video (using my Panasonic LX-3 camera) while out riding. However, I wasn’t sure how to securely attach the camera to my bike.
Then I remembered this thing called the internet (!), which turned up quite a few designs along the lines of what you see below.
 It’s a hodgepodge of nuts, bolts, and washers with a reflector mounting bracket as the base. The 1/4 main bolt screws into my camera’s tripod mount. The little acorn nut on top is just to keep everything together when the camera is not attached.
Below is all the hardware.

Essential hardware -- DIY bicycle handlebar camera bracket
Here’s the camera mounted to the bracket.
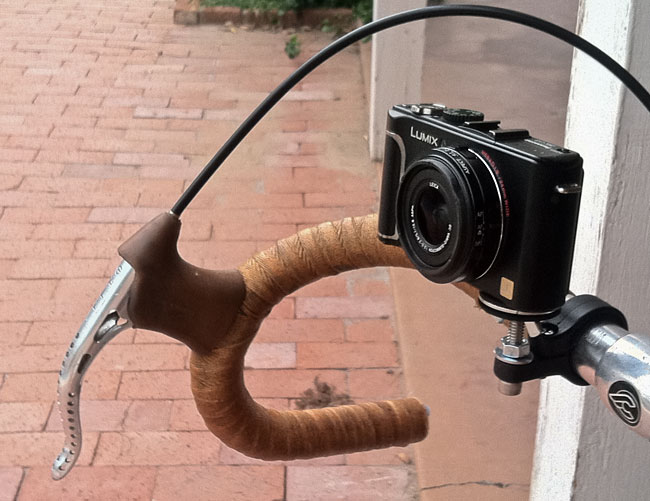
Lumix LX-3 on homemade handlebar mount
What’s missing from this photo is the Opteka 0.35 fisheye lens that I plan to attach to the LX-3 for shooting video.
I hope to post some examples soon!
Random Images……Desert vistas with the iPhone 4’s camera
Many of the pictures posted over the last few months were created with the iPhone’s built-in camera.
The image quality is inferior to my Lumix LX-3, but the LX-3 was itself a compromise. I used it mainly because it was smaller and more convenient to carry on my bicycle than the alternatives.
Now, size and convenience are winning out again — hence the increased use of the iPhone.


Since these images are primarily intended for the web (and never larger than 650 pixels wide) I have some margin for error in terms of image quality. That’s why I can still produce acceptable results even when facing tricky lighting situations like those seen in these desert vistas. (However, for the first shot I had to combine two exposures in order to retain marginal detail in the foreground shadow areas.)
The biggest drawback is that printing larger images for a gallery show or portfolio may not be achievable. For this, I could really use a larger sensor, but still compact, Olympus EP-3 or Fuji X-100 — which are the cameras I’m drooling over currently.
However, at this point, I should remind myself of the unlimited nature of material desire and the profound teachings of the Buddha — especially his “Second Noble Truth.”
Nathan
Gear Gallery……The Cricket trailer
I want one of these Cricket Trailers, which are designed and built by an architect who worked on NASA’s “habitation modules” — the small spaces where astronauts live!
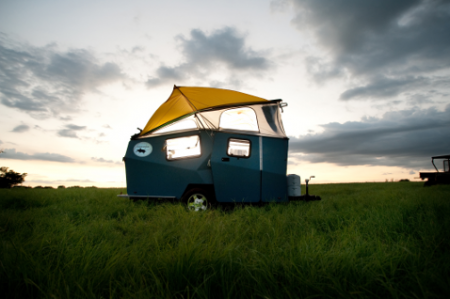
The Cricket Trailer -- www.crickettrailer.com
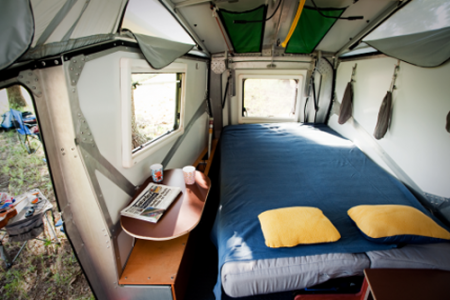
The Cricket's sleeping quarters -- www.crickettrailer.com
Here’s a stylish video with more interior shots of the Cricket, including views of the galley and the loo.
On the Road……Jitensha Studio, Berkeley CA

Jitensha Studio projects a humble store front, yet inside Hiroshi Iimura — a modern bicycle constructeur — creates some of the most beautiful, functional, and harmoniously integrated bicycles I’ve ever seen.
A constructeur (as opposed to a framebuilder) assumes a holistic approach to bicycle creation. The constructeur integrates lighting, fenders, racks, and pannier bags; and, simultaneously, balances the bicycle’s intended use with its frame geometry, tire size, clearances, and a myriad of other choices, e.g., stem length, handlebar width, chain ring sizes, saddle and peddle type, etc., etc.
The most famous constructeurs of the 20th century were Rene Herse and Alex Singer, both from France. Hiroshi Iimura reflects this tradition.
I love this quote from Hiroshi published in a 2006 New York Times profile: “If a customer wants a component that is not to my taste, I refuse…I have to satisfy my own tastes first.”

Jitensha Studios, Berkeley, CA
Unfortunately, Hiroshi’s shop was closed the afternoon I was in Berkeley so I missed the chance to say hello. Although, I suspect he gets tired of people dropping by to say hello since he always seems to have a bicycle project or three in the works.

Jitensha Studio, Berkeley, CA
[Full disclosure: I own one of Hiroshi”s production Ebisu 650B models]
On the Road……Jorg & Olif Dutch commuter bike spotted in SF
A beautiful Jorg & Olif internally geared 8-speed with chain and skirt guards, rear rack, wicker basket, sprung saddle, double kick-stand, and a front generator light. The rider says she frequently commutes to work in the financial district on this classic ride.
It’s hard to say which is lovelier the bicycle or the rider?…I have to say — it’s the rider 🙂


Gear Gallery……Pedals for all Occasions

I still prefer toe-clips and leather straps for long, somewhat fast rides, but these MKS touring pedals are my favorite choice for everything else. As a consequence, I end up swapping pedals from bike to bike.
Below are pedals currently in my mix (clockwise from top left): Campagnola (super record?); MKS royal noveau; MKS sylvan touring; and MKS 3000 rubber block pedals.

A collection of Campagnola and MKS Pedals
The rubber block pedals are a new purchase (for my Nishiki city bike). I went to 4-5 bike shops (including a local bicycle recyclery) and none had this simple design so I ordered them from the Velo-Orange store.
Also, the 13″ long wrench (an ELDI no. 61 available from Rivendell) is a worthwhile investment if you swap pedals frequently.
Gear Gallery……Velo-Geo-Photo blogging tips, Part I

Since I began publishing this blog a year-and-a-half ago, I haven’t talked much about behind-the-scenes stuff.
So I’m changing things up today.
In this post (Part I), I’m outlining some of the tools and equipment I find most useful as a Velo-Geo-Photo-blogger. Then, in the next installment (Part II), I plan to talk about my general process for making photographs and observing my surroundings while out on a ride.
First, the tools of the trade:
A camera: When riding, I almost always bring along a Panasonic LX3 with its Leica branded 24-60mm lens. I’m a big fan of Panasonic/Lumix cameras. I had the LX1 before this and also own the less known L1. At 60mm, the LX3 is a bit lacking on the long-end of its zoom range (I think the updated LX5 zooms to around 90mm), but it is very compact and fits perfectly in the pocket of my handlebar bag.
A gps logger: My AMOD 3080 is critical for determining the GPS coordinates of a photo or location. I can record individual points of interest by pressing a button during the ride. After the ride, I can also time sync the gpx file of the data logger with the photo files in order to determine the precise location of each photo. (Note: a more elegant and time saving solution would be to carry a camera with built-in GPS capabilities which writes geo-data automatically to the photo’s metadata. Then I would only need one gadget on board, not two.)
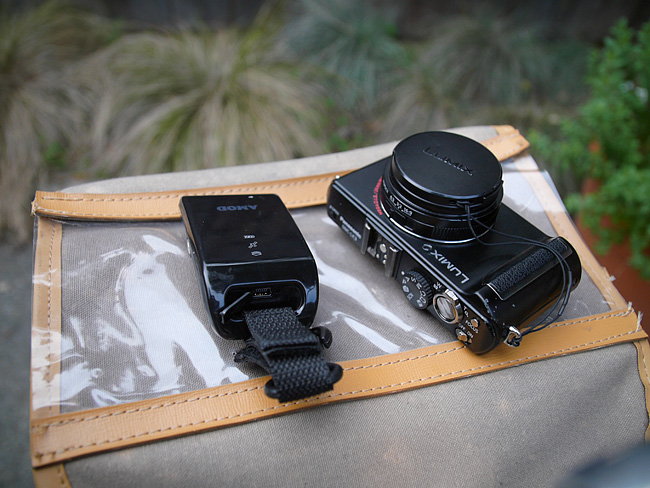
Some critical equipment
A front rack and handlebar bag: My old Guerciotti has neither cantilever brake mounts on the forks nor eyelets on the front dropouts so my rack choices are limited. I ended up installing the versatile Mark’s Rack from Rivendell and use a classic TA bag I bought on eBay many years ago. I don’t have a decaleur so the bag flops around a bit when I ride. Some plastic stiffeners would help I just haven’t gotten around to addressing this problem yet.

Camera, GPS logger, and TA bag
Photo processing software: I use Adobe Photoshop CS3 and Bridge (which acts as a digital light table for viewing and sorting images) on an older Mac G5 and Apple cinema display.
For making images and posting them to the web I usually follow these steps:
- First, create a composition to best capture the subject matter (this can take several attempts and may require careful cropping of the image).
- Make creative changes as needed (e.g., adjustments to contrast, color, or luminosity) so the image expresses the feeling of the scene as it was experienced. This is critical. Remember what Ansel Adams said: “The negative [read: digital raw image] is the score; the print is the performance”.
- Re-size the image (in my case to around 650 pixels wide) and down sample the resolution (to around 100 ppi) so it properly fits the intended space and so the file doesn’t take up too much memory.
- Lastly, sharpen the photo while viewing it at the final size and resolution. This is very important and a reason many images do not look very good is that they are not optimized for viewing on the web at the actual size they are displayed.
A blogging platform: I use WordPress.org and a heavily modified version of the Black Letterhead theme. I also use various WordPress plug-ins. The most indispensable is Geo Mashup. It’s fantastic. One of its most useful features is the ability to display each post’s image on a main map page. I also use XML Google Maps, WP-prettyPhoto, and WordPress Video Plug-in.
A bicycle: Often it’s a steel-framed Guerciotti that I’ve owned since high school outfitted with mostly Campy components, a recently added 12-28 suntour 6-speed freewheel, a Brooks titanium rail saddle, and Grand Bois 28mm tires!
Gear Gallery……Dahon vs Brompton: a Folding Bike Comparison
I narrowed it down to two folding bikes. What follows is a mini-review.

What I like about the Dahon Mu Uno (left):
- styling/build: not flashy; matte black finish; 20-inch tires; double kick-stand; ruggedly constructed.
- simplicity: no derailer or brake cables to worry about and a near perfect 62″ single gear.
- ride: stable handling; more like a full-size bike when compared to the Brompton.
- racks: none supplied, but accepts klickfix accessories.
And the drawbacks:
- more conspicuous than the Brompton when folded and not as compact;
- not designed to fold with attached fenders and racks;
- while ruggedly built, it’s doesn’t wreak of craftsmanship like the Brompton (i.e. it feels more mass produced).

What I like about the Brompton (right):
- quality engineering: extreme attention to quality and workmanship.
- folding design: ingeniously compact; easier to take on airlines/buses/metros; and a design that incorporates fenders and a rear rack!
- versatility: 3-speed internal gear hub with a perfectly spaced 48″, 64″, and 85″ set of gears; fenders and racks included on most models.
The drawbacks:
- price (more than double that of the Mu Uno);
- a few extra parts and a more complicated drivetrain make it feel more fragile than the Mu Uno with the potential for more maintenance and repairs;
- rides less like a full-size bike compared to the Mu Uno (probably due to the smaller 16″ wheels); however, in normal use, you adjust quickly to the differences.

Conclusion: These are both appealing bikes. If I just needed a simple and robust city bike for basic transportation in a relatively flat urban environment — the Mu Uno would be perfect.
I would think nothing of tossing around the Mu Uno or leaving it chained to a parking meter, but I would think twice about doing this with the Brompton (in this regard the Brompton’s elegant craftsmanship is a bit of a mixed blessing, as it is with all fine bicycles).
In the end, the Brompton’s versatile (yet still relatively simple) 3-speed gear range and ease of toting around (especially while fendered and on airlines) were the deciding factors for me.
For its first test, I brought the bike via airplane to Minneapolis in it’s own suitcase. While it rained the whole time, the Brompton truly shined.
Gear Gallery……Ladies and Gentleman, the Brompton

Folded Brompton
I vowed my next bike would be a folding bike. A planned short trip to Minneapolis proved to be the trigger.
I narrowed it down and compared two very different bikes: The Dahon Mu Uno and a 3-speed Brompton M type.
I plan to have more notes and photos on the comparison and which one I ultimately chose and why. (Although these images of the Brompton packed for airline travel are a giveaway.)

Hardshell suitcase ready for air travel
Gear Gallery……Silca Frame & Floor Pumps, II

Silca Floor Pump, circa 1983
I’ve only experienced classic Italian-made Silca pumps. Maybe some other manufacturer makes a better, easier to use, more effective, or lighter model, but these are solidly made and do the job just fine.
My Silca Pista floor model is more than 25 years old (and spare parts are still available!). I replaced the hose, clamps and washers about 5 years ago and have a few different pump heads (one brass, one plastic).
On the Silca frame model, I like Campagnolo’s steel pump head as an upgrade to Silca’s original plastic pump head, but these are hard to find and often run $50 or more on ebay.
Mounted to the Seat-tube
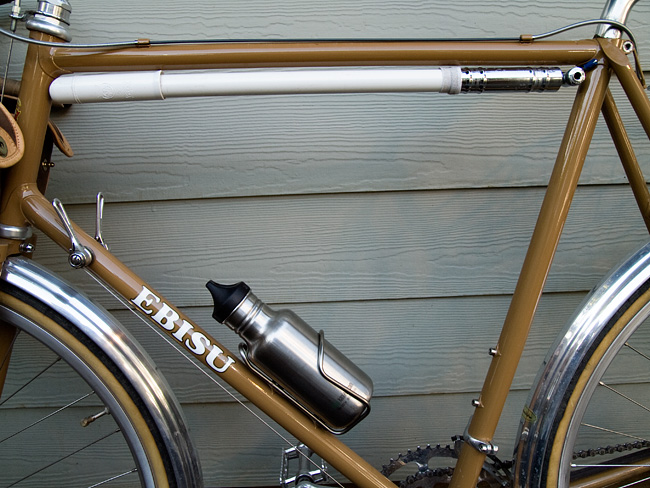
Mounted to the Top-tube
Gear Gallery……Silca Frame Pumps
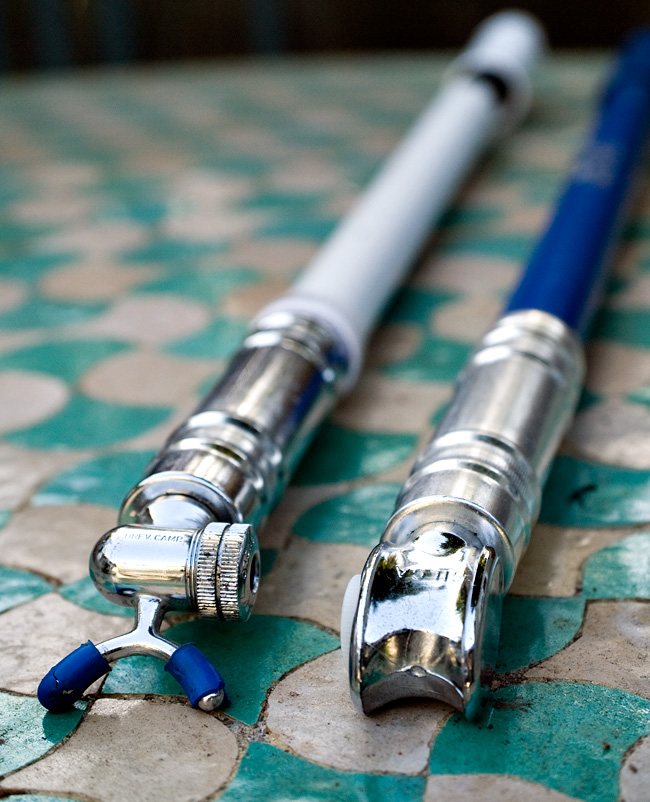
Silca Frame Pumps
I always carry a pump.
Well, not always. I don’t carry a pump on my city bike when I’m riding 0-3 miles around town. But on any other kind of ride I carry a pump, two spare tubes, and a few tools. (I began carrying two tubes after receiving two flat tires on one ride.)
It can be argued that mechanical self-sufficiency is less critical in the era of cell phones. Still, if you ride a lot something will eventually come loose or break and you’re sure to get flat tires every now and then.
And in my experience, even having a tiny bit of self-reliance adds to the joy of riding.
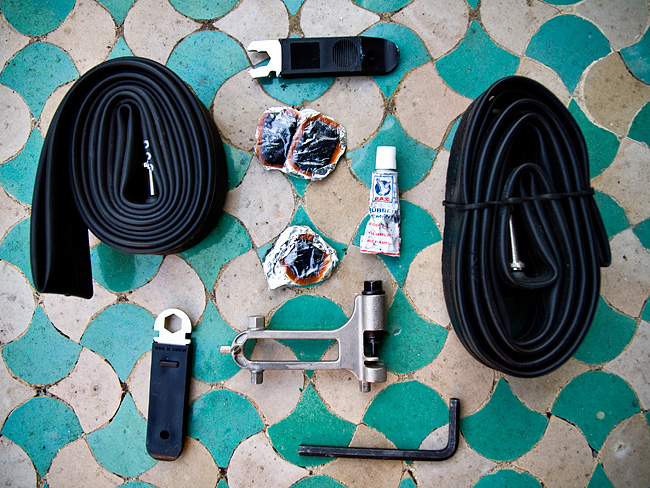
Tool Kit
Gear Gallery……Mother’s Day Brunch

The Ebisu‘s rear basket is loaded with supplies (grapefruit, rustic cantaloupe, and goat’s milk yogurt) to add to a Mother’s Day brunch held at my brother’s house.

 The basket is made by Wald and it’s attached to the rear rack with plastic zip-ties. I usually anchor the corners and then add a few more ties until it can’t move or slide the slightest bit. For a clean look snip off the zip ties close to the rack. (Here, I was too lazy and left the excess.)
Gear Gallery……Guu-Watanabe Bag (fabrique en Tokyo)
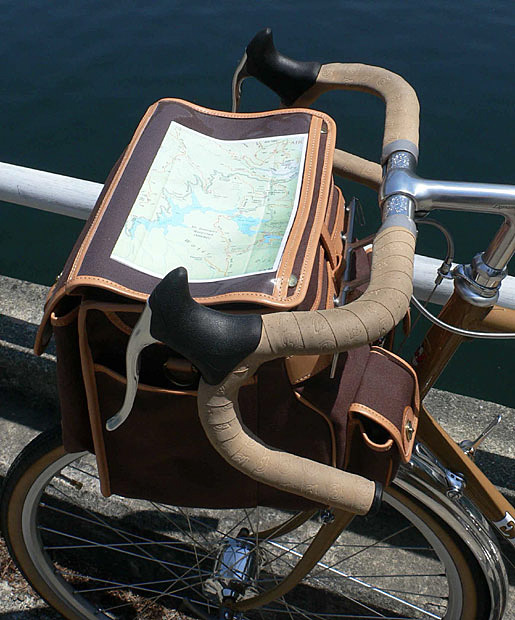
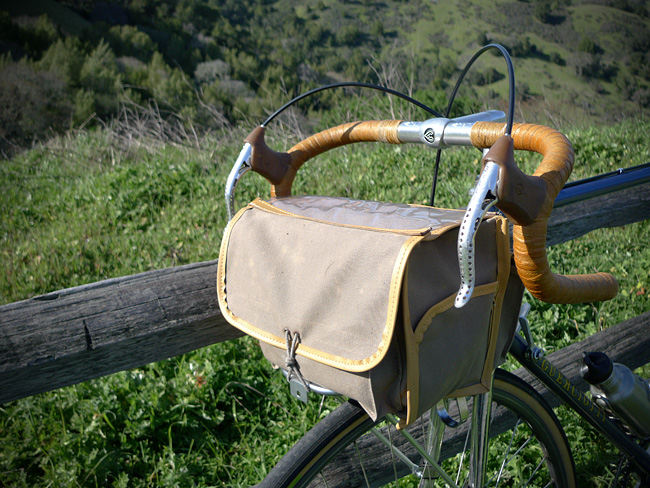
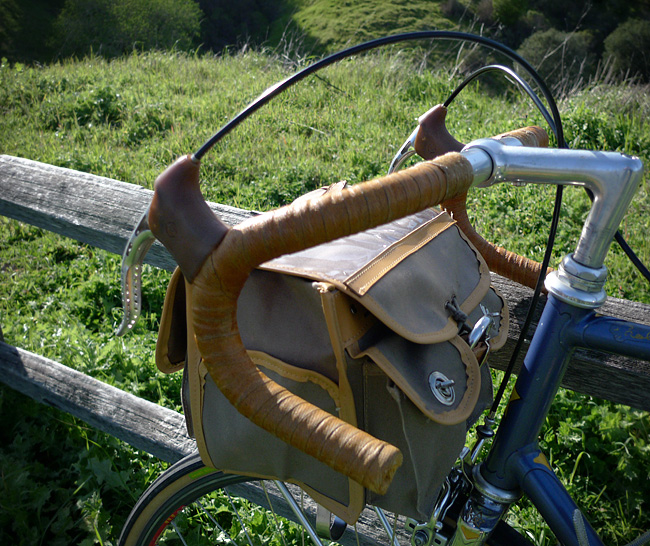
Guu Watanabe Handlebar Bag
I saw a random picture of a handmade Guu-Watanabe bag back in 2006 and thought it was the most elegant design I had ever seen. (I urge you to spend some time exploring the design options now available on their website).
Shortly after seeing one of these bags, I tracked down the maker, Watanabe Shoichi, in Tokyo and together (with limited common language skills) we designed the bag for my Ebisu, emailing measurements and drawings back and forth until we had the proportions just right. I believe I was his first customer outside of Japan.
I’m still delighted with my purchase. It was — and still is — impossible to get a bag this size. It is much bigger than either the Ostrich bag or the Berthoud and it fits the proportions of my 59cm 650B frame just right, as I think is very clear in this photo.
The only flaw — if you can even call it a flaw — are the straps and metal buckles (a slightly fussy or showy detail that has no place in classic randonneuring designs). I would have preferred simple elastic and hook closures (and I notice that Shoichi now uses this type of closure on his current line), but otherwise it is perfect.
Gear Gallery……Guu-Watanabe Handlebar Bag (fabrique en Tokyo)
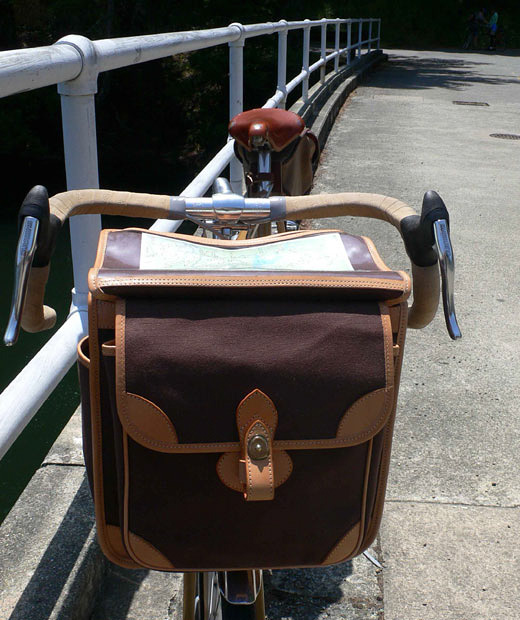
Guu Watanabe handlebar bag
Gear Gallery……Guu-Watanabe Handlebar Bag (fabrique en Tokyo)
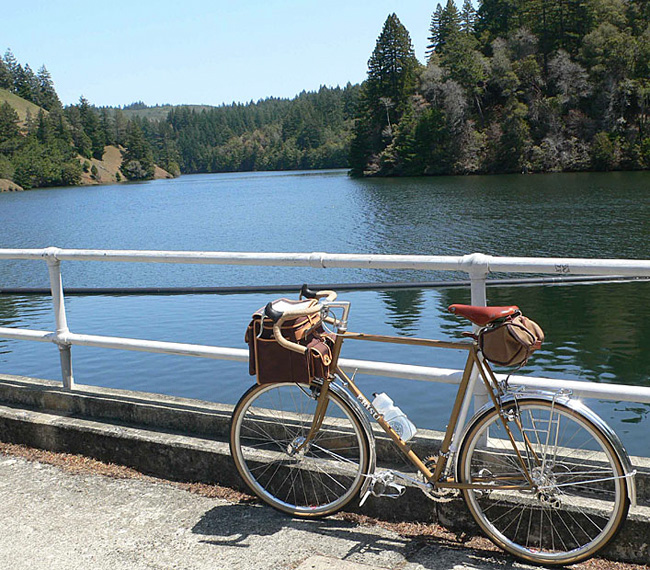
Guu Watanabe bag at Alpine Lake
Gear Gallery……TA Handlebar Bag (fabrique en France)
TA Handlebar Bag
TA Handlebar Bag
The legendary Specialtes TA handlebar bag. Circa 1970s or early 80s. A randonneuring classic.
Kids always stop me on the street and ask who makes it and where can they find one.
Unfortunately, they can’t be found. But modern Acorn bags — while expensive — appear to be just as good (probably better).
Gear Gallery……Designer Bikes
These bikes come from an urban design house in NYC — Areaware. The folding ifmode is quite elegant (and it’s not a small-wheeler either; it’s a full-sized bike). The Vanmoof uses solar energy for its lighting. As I said before: it truly is a golden age of cycling!

Biking Culture……Folding Bikes
Since a trip to Seattle last fall, folding bikes have been on my radar. I made a silent vow that my next bike, whenever it comes, will fold-up for bus and ferry connections and general urban mobility.
This video got me excited about the Brompton:
Then I heard great things about the Bike Friday Tikit. And now, the latest bike on my radar is the Dahon Mu Uno. It’s The Old Man and the Sea of folding bicycles — a minimalist masterpiece. No gears. No cables. Back-pedal brakes.
I first read about it on design guru, Rob Forbes’ site, Studio Forbes. Here’s how to fold it:
Biking Culture……Ecovelo Photo Contest
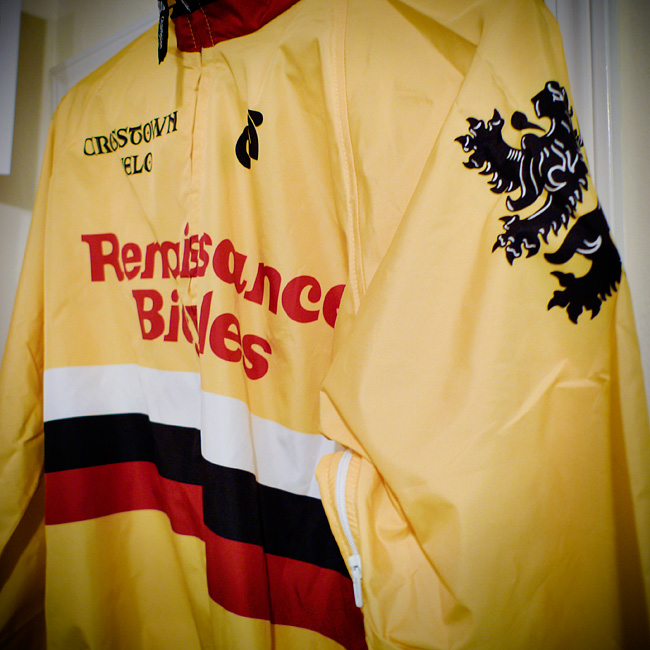
The image on the left (click the thumbnail to embiggen) received an honorable mention last December in Ecovelo’s ‘end of summer’ photo contest. As a prize, I was sent a rather flamboyant wind breaker that I’m slowly gaining appreciation for, especially the heraldry — sable, a griffin rampant — on the sleeve. Thanks Ecovelo!
All the posts from that long day trip down the coast to Santa Cruz are compiled here (or by selecting the destination from the category drop down menu in the right margin).

Gear Gallery……Local Bike Kitchen: ‘The Bicycle Works’

Changing a freewheel is about a 2-3 minute job — if you have the correct tool!
To mount the Suntour 13-28t I needed a special Suntour four-prong extractor. So I rode down to The Bicycle Works and found one in their tool collection.
They’re located at Yolanda Station along the east-west bike route in San Anselmo. If you’re not yet a member consider joining.
From The Bicycle Works website:
The Bicycle Works is Marin’s non-profit do-it-yourself community bicycle tool workshop empowering our community with knowledge, skills, tools, and materials for bicycle related activity with open workshops, classes and a space for creative collaboration. Directors Jelani Bertoni and Spokey Godfrey, have launched this hub of community in San Anselmo to inspire the people and the planet to live more active, sustainable lives.
That’s Jelani in the background of the above picture. He showed me the neat trick of securing the extractor in the bench vice and then turning the wheel with downward pressure to unscrew it (normally, I would brace the wheel on the ground and turn the extractor with a long wrench — a much worse way to go about it).
Thanks Jelani!
Gear Gallery……Freewheels and Gear Ratios

I once avoided anything having to do with gear ratios as the subject would make my eyes glaze over, but they’re obviously really important. The late Sheldon Brown — expert on everything bicycle related — created a simple and useful gear calculator which helped reduce my fear of the arcane subject.
My Guerciotti originally had a rear cluster of cogs ranging from 13-23 teeth, as seen on the freewheel on the right, which is a good set-up for racing on mostly flat or rolling terrain.
But here’s the problem: this gear range — coupled with 42t and 52t chain rings in front — is horribly suited for Marin County’s mountainous terrain (remember: the more teeth, the bigger the cog, and the easier it is to pedal. For the front chain rings — the opposite is true).
The solution: ditch this set-up and replace it with a cluster with a 25t as the largest cog. This worked much better, but I still yearned to spin an easier gear up Bolinas ridge and other tough climbs. I discovered that some 6-speed freewheels were made with a 28t cog, which seemed just perfect and wouldn’t require a special long-cage rear derailer (necessary for rear cogs above 28t).
A Suntour freewheel with a 28t cog is pictured on the left.
I can’t wait to install it!
Technical Note: According to Sheldon’s calculator, with the new Suntour freewheel my drive wheel has an equivalent diameter of 40.1 inches (i.e. gear inches) compared to 48.9 inches using the original 23t freewheel, resulting in about a 20% improvement. Still, the low gear of a typical mountain or touring bike is another 50% or so lower, at around 20-25 gear inches.
Gear Gallery……Wald Grocery Basket, a mini-review

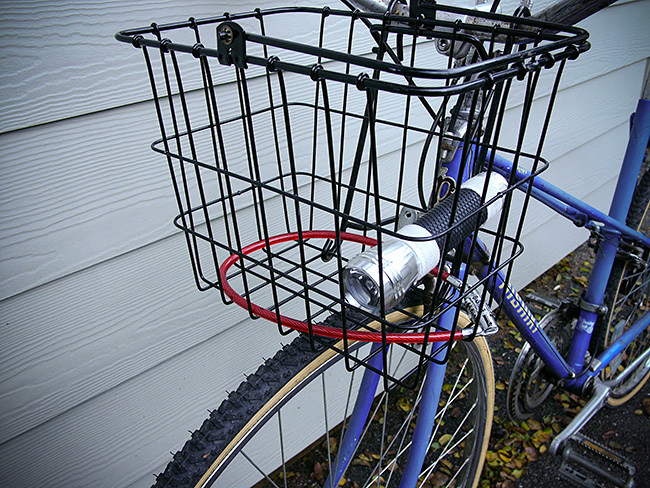
Mini-Review: This is Wald’s model 114 basket attached to my Nishiki. There is no fork or brake bolt hardware to deal with; it stays attached with curved pressure points resting below the headset and with hooks around the handlebars. So for around $20 and two minutes of work you’ve got a basket (granted it’s not particularly elegant or permanent). Still, I’ve severely overloaded mine and it performed really well.
A standard grocery sack will almost fit, but not quite (If that matters the model 133 may be the better choice) so it’s not good for big hauls — a six-pack, a carton of eggs and some bread, that sort of thing works best. The other day it was overflowing with veggies — leeks, cauliflower, broccoli, carrots, cabbage, some shallots — for making a blended Portugese-style soup. This photo was made after a morning breakfast run.
A lift-up handle releases the basket from the its mount so you can carry it into the store or around the market.
Gear Gallery……Wald Grocery Basket

Gear Gallery……The Quotidian Nishiki Sport

Nishiki Sport Mixte
The Nishiki is a great city bike. The upright position is so comfortable (the height of the handlebars really contributes to this) that I ride it instead of my Guerciotti or Ebisu on errands around town.
I use it for trips to the Post Office, the Coffee Roastery, the Good Earth, the Scoop, Gestalt Haus, Fat Angel, and (especially) the hardware store. I’ve carried four cans of paint (two one-gallon cans and two one-quart cans) by using the front basket and then hanging one of the gallon cans around the handlebar grip. I’ve also carried 10 eight-foot strips of redwood lathe.
What I’ve added: a front basket, a kickstand, a bell, new tires, an extra long seat post (so I could get the seat up high enough to make the smallish frame fit better), and a halogen flashlight that I wedge in the basket for night riding.
What I’d like to add in the future: fenders, a bigger basket, mounted head and taillights, maybe an internal gear hub, and ultimately a full conversion to the 650B wheel size so I can use wider tires.
Gear Gallery……650B x 38mm tires

The Fabled Mitsuboshi Trimline
Three millimeters seems insignificant, but to the growing number of 650B wheeled bicycle riding nerds like myself, 3mm is a big deal.
The Quest for a 38mm tire. This is considered the sweet spot for optimizing the handling of many French-style, bicycle frames (designed for carrying stacks of newspapers, bottles of wine, food, camping gear, or what have you, on a front rack, in panniers, or in a handlebar bag).
Yet there are very few 650B x 38mm tire choices. The Col de la Vie, which I have on my Ebisu, is marketed as being 38mm wide, but it’s really only about 35mm.There’s also the Hetre, by Grand Bois, a new and beloved tire which is a full 42mm wide. Unfortunately, when properly fendered (with at least 8-10mm of clearance), not many frames can accommodate this width.
The Mitsubishi Trimlines pictured above once filled the hallowed 38mm niche, but they have been discontinued (I’ve been trying to locate a pair for 4 years). A replacement for the Trimline has been the Holy Grail of the 650B biking community for a number of years.
Finally, a replacement (or two). It seems there will be not just one, but perhaps two true 38mm tires to fill this void.
First, the Pari-Moto; you can place your orders now. Second, a new and as yet unnamed, Grand Bois model (expected to be a true 38mm wide) rumored to be coming in the first part of 2010.
Three cheers for more wide tire choices!
P.S. Searching for a photo of the Col de la Vie I came across a similar post at velo-flaneur, which reported this news months ago. This is a great blog; check it out!
Gear Gallery……Retro Cycling shoes

In a word: beautiful.
You may recall my earlier post lamenting the short supply of good bicycling shoes. Well, Vittoria has created a gorgeous, classically-styled yet thoroughly modern (cleated) shoe.
I found the picture at the Pushbike blog, apparently they’re in stock at their 24th St. shop in San Francisco.
Gear Gallery……Brooks Saddle video
After writing the previous post on bicycle saddles, I discovered this video about the Brooks’ manufacturing company over at The Velo Hobo. It’s a quaint look at the company behind this iconic piece of cycling history. (Skip to the 7:23 mark of the video to see the very cartoon-like English guy in charge of leather chamfering. He’s great).
Gear Gallery……Bicycle Saddles

When I built up my Ebisu I decided on a Brooks saddle, my first. I went all-out and purchased the Team Professional with titanium rails (figuring I’d save some weight) and by good fortune found a used version with nearly zero miles.
They say you need to break a Brooks in and indeed the leather softened up and took on a more comfortable quality after about 400-500 miles (though it has broken in a little unevenly from side-to-side. Sadly, I’ve heard talk that Brooks’ quality is deteriorating).
Nonetheless, I love my Brooks saddle. I’m a convert.
My other saddle is a Concor, Selle San Marco from the early 80’s (I double checked and although the wording has mostly worn away it is the coveted superleggera (Italian for Super Light) model — super comfy and still going strong after 25 years!
Seen from the back in this post, the Concor is the original saddle on my Guerciotti and usually stays there because I’m too lazy to switch the Brooks back and forth between bikes. But fairly frequently, I do switch them because as comfortable as the Concor is it just can’t beat the Brooks in that category.
Gear Gallery……Bicycling Shoes

If you’re looking for a comfortable, good-looking, all around touring-type shoe: good luck! It was easy to find great cycling shoes meeting this description in the 70’s and 80’s. Today, it is nearly impossible.
For many, many years I remained faithful to my Italian-made Detto racing shoes (pictured on the far right) in conjunction with toe clips and leather straps even though clipless pedal systems have been standard for at least the last 15 years. Actually, both these systems are quite awkward as soon as you try to do any walking (surely you’ve heard the clickity-clack sound of bicyclists in a coffee shop). But having said that, these systems do make sense under certain conditions.
However, what’s missing from today’s marketplace is a moderately priced shoe–without cleats–that can be used for long distance riding that also allows you to blend in when you decide to park your bicycle and head to the cafe or farmer’s market. Read the rest of this entry »

